Game 1 (1976)
The following game was played between David Johnson-Davies and Charles Matthews of the Clare College Lasca Association, Cambridge, 1976.[1]
| White: David Johnson-Davies | Black: Charles Matthews | |
|---|---|---|
| 1. | c3-d4 | e5xc3 |
| Centre opening so: | ||
| 2. | b2xd4 | |
| recapturing to the centre – the usual idea. | ||
| 2. | .... | f6-e5 |
| 3. | d4xf6 | g7xe5 |
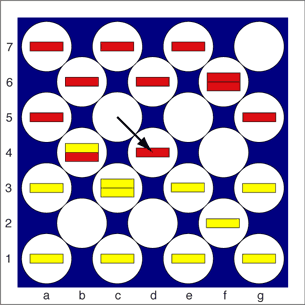
| 4. | c3-d4 | |
This move of White’s is an unusual approach. If instead he plays: 4 e3-d4, c5-d4-e3; 5 f2-e3-d4 and Black is now cramped; if he plays the standard combination: 5 . . . b6-c5 we have: 6 d4-c5-b6, a7-b6-c5; and Black has no waiting moves; White has just to play: 7 g1-f2 and Black must lose substantially on his next move:

| 4. | .... | e5xc3 |
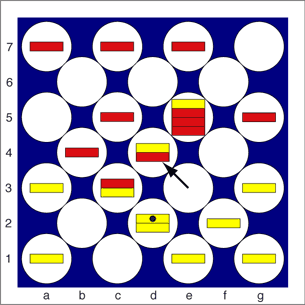
| 5. | d2xb4 | c5-d4 |
Trying to set up a long combination:
After White has captured twice to g7, a column of three black men is contained under the white officer and Black’s hope is to liberate these eventually, gaining a strong piece. However in this game it does not work out so well.
| 6. | c3xe5xg7* | |
| since if White chooses the other capture, Black’s double capture is unpleasant. | ||
| 6. | .... | a5xc3 |
| 7. | g7xe5 | |
| The other capture brings no advantage and so can be postponed. | ||
| 7. | .... | d6xf4xd2 |
| 8. | c1xe3 | |
| and White seems well ahead. | ||
| 8. | .... | b6-c5 |
| since White’s capture here would not be advantageous. | ||
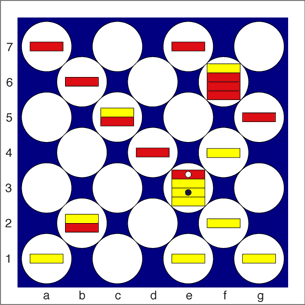
| 9. | e3-d4 | |
a tricky move:
White’s object (as in Black’s 5 above) is to set up a column of men to liberate eventually. Of course if there were no black prisoner under the white soldier on D4, this would be a direct manoeuvre.
| 9. | .... | c5xe3xc1* |
| 10. | a3xc5 | c1xe3 |
Black cannot now afford to lose his column on e3; moreover he lacks good moves elsewhere.
| 11. | g3-f4 |
This occupies an important point enabling White to play e5-f6 in safety; otherwise Black plays g5-f6 etc.
| 11. | .... | c7-b6 |
The only reasonable move. Black’s e3-d2 is refuted by White a1-b2.
| 12. | e5-f6 | c3-b2 |
Black b6-a5 would have been calmer, and would give Black a chance to repair his position slowly:
| 13. | a1xc3xe5 | b6xd4 |
Black accepts a small loss and has the more mobile position. However White now initiates a large-scale exchange:
| 14. | b2-c3 | d4xb2 |
| 15. | f2xd4xb6 | a7xc5 |
| 16. | e1-f2 |
White f6-g7 would have made the game safe.
| 16 | .... | c5-d4 |
| Black's last try. | ||
| 17. | e3xc5xa7* | g5xe3 |
| 18. | a7xc5 | e7xg5 |
| 19. | e5xg7* | e3-d2 |
Black f6-e5 would save a piece, but the position is hopeless:
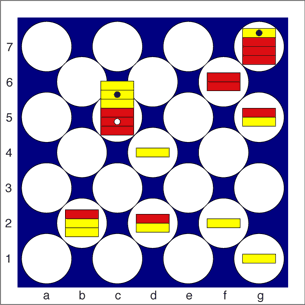
In the endgame both sides have three mobile pieces but White’s strong column is dominant; Black cannot afford any sacrifices and so is tactically helpless.
| 20. | g7xe5 | d2-e1* |
| 21. | e5xg7 | e1xg3 |
| 22. | d4-e5 | b2-c1* |
| 23. | e3-d4 | g5-f4 |
| 24. | d4-c3 | f4-e3 |
| 25. | c3-d2 | e3-f2 |
| 26. | g1xe3 | g3xe1xc3 |
| 27. | d2xb4 |
Black resigns.
- ^ David Johnson-Davies: Lasca - a Modern Classic. Games and Puzzles magazine, No. 59, April 1977, p. 8-9.